Module
例化模块
按名称将信号连接到模块的端口允许电线保持正确连接,即使端口列表发生变化。
mod\_a instance2 (
.out(wc),
.in1(wa),
.in2(wb)
);
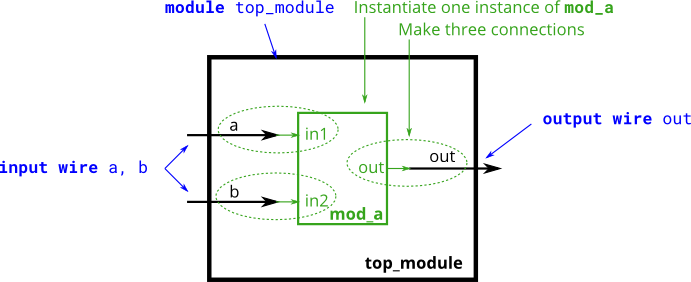
module top_module ( input a, input b, output out );
    mod_a mod_a_inst(
        .out(out),
        .in1(a),
        .in2(b)
    );

endmodule
Module pos
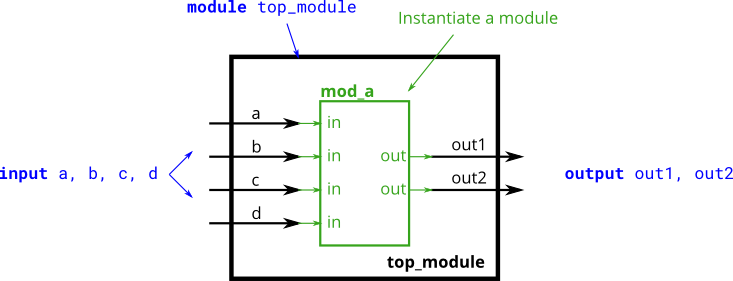
你将获得一个名为 mod\_a 的模块,该模块具有 2 个输出和 4 个输入(按该顺序排列)。
必须按位置将 6 个端口按该顺序连接到顶级模块的端口。
module top_module (
    input a,
    input b,
    input c,
    input d,
    output out1,
    output out2
);

    mod_a instance1 ( out1, out2, a, b, c, d );

endmodule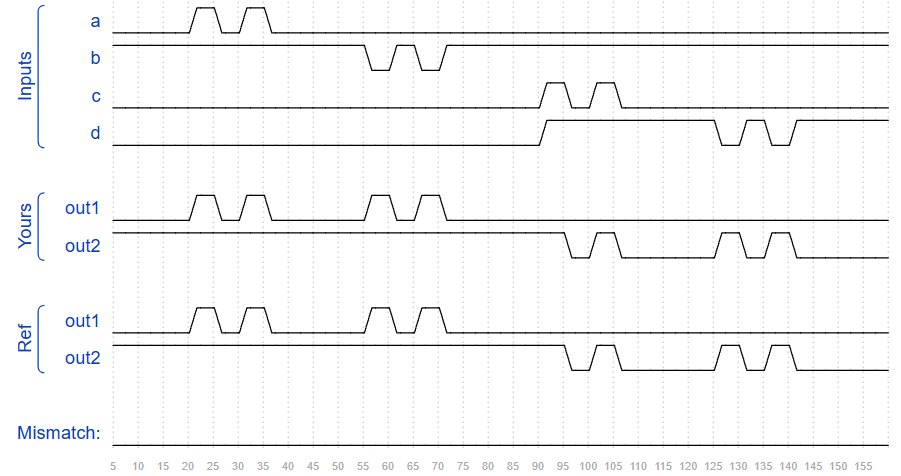
Module name
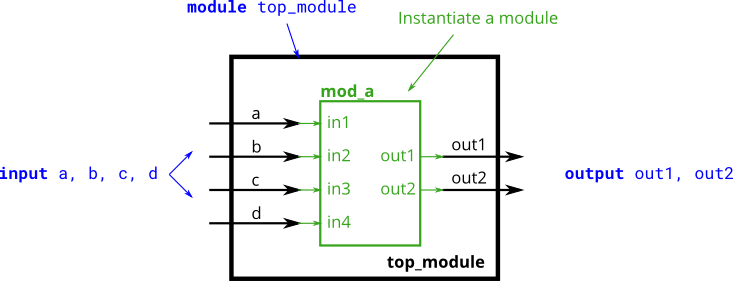
例化模块,端口对应的连接。
module top_module (
    input a,
    input b,
    input c,
    input d,
    output out1,
    output out2
);

    mod_a instance1 ( .out1(out1), .out2(out2), .in1(a), .in2(b), .in3(c), .in4(d) );

endmodule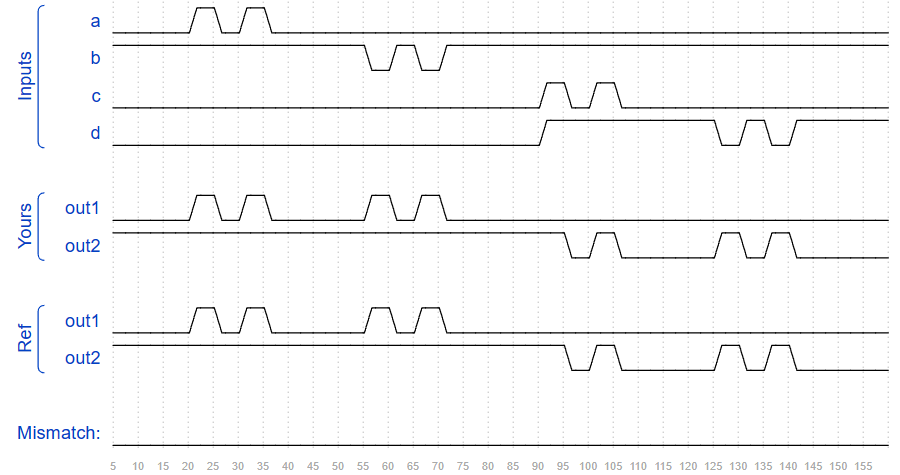
Module shift
您将获得一个具有两个输入和一个输出的模块(实现 D 触发器)。实例化其中的三个,然后将它们链接在一起以形成长度为 3 的移位寄存器。端口需要连接到所有实例。my_dff`clk`
提供给您的模块是:module my_dff ( input clk, input d, output q );
请注意,要进行内部连接,您需要声明一些电线。命名线路和模块实例时要小心:名称必须是唯一的。

module top_module ( input clk, input d, output q );
    wire a,b;
    my_dff d1(
        .clk(clk),
        .d  (d),
        .q  (a)
    );

:


endmodule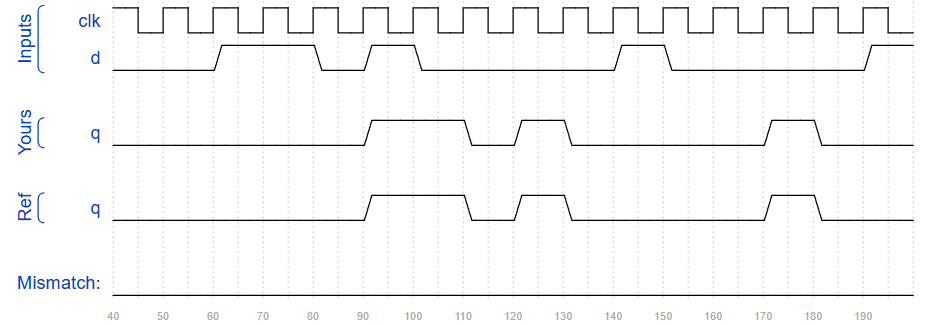
Module shift8
您将获得一个具有两个输入和一个输出的模块(实现一组 8 D 触发器)。实例化其中三个,然后将它们链接在一起,形成长度为 3 的 8 位宽移位寄存器。此外,创建一个 4 对 1 多路复用器(未提供),该多路复用器根据以下条件选择要输出的内容:输入 d 处的值、第一个 d 字拖之后、第二个之后或第三个 D 触发器之后的值。(实质上,选择延迟输入的周期数,从零到三个时钟周期。my_dff8`sel[1:0]`sel
提供给您的模块是:module my_dff8 ( input clk, input [7:0] d, output [7:0] q );

module top_module (
    input clk,
    input [7:0] d,
    input [1:0] sel,
    output [7:0] q
);
    wire  [7:0]a;
    wire  [7:0]b;
    wire  [7:0]c;

    my_dff8 d1(
        .clk(clk),
        .d  (d),
        .q  (a)
    );

    my_dff8 d2(
        .clk(clk),
        .d  (a),
        .q  (b)
    );

    my_dff8 d3(
        .clk(clk),
        .d  (b),
        .q  (c)
    );

    always@(*)
    begin
        case(sel)
            2'b00:q = d;
            2'b01:q = a;
            2'b10:q = b;
            2'b11:q = c;
        endcase
    end


endmodule
Module add
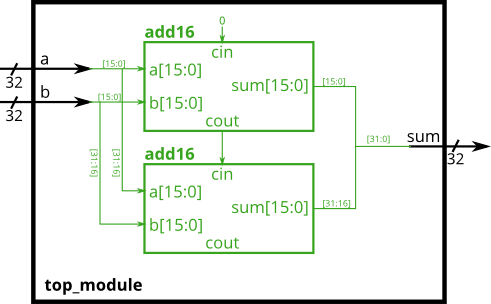
您将获得一个执行 16 位加法的模块。实例化其中两个以创建 32 位加法器。一个 add16 模块计算加法结果的低 16 位,而第二个 add16 模块在收到来自第一个加法器的结转后计算结果的高 16 位。您的 32 位加法器不需要处理进入(假设为 0)或传出(忽略),但内部模块需要处理才能正常运行。(换句话说,模块执行 16 位 a + b + cin,而模块执行 32 位 a + b)。add16`add16`
如下图所示将模块连接在一起。提供的模块具有以下声明:add16
module add16 ( input[15:0] a, input[15:0] b, input cin, output[15:0] sum, output cout );
module top_module(
    input [31:0] a,
    input [31:0] b,
    output [31:0] sum
);
    wire [15:0] high16,low16;
    wire cout1,cout2;

    add16 add16_low_inst(
        .a   (a[15:0]),
        .b   (b[15:0]),
        .cin (1'd0),
        .sum (low16),
        .cout(cout1)
    );

    add16 add16_high_inst(
        .a   (a[31:16]),
        .b   (b[31:16]),
        .cin (cout1),
        .sum (high16),
        .cout(cout2)
    );
    assign sum = {high16,low16};
endmodule
Module fadd2
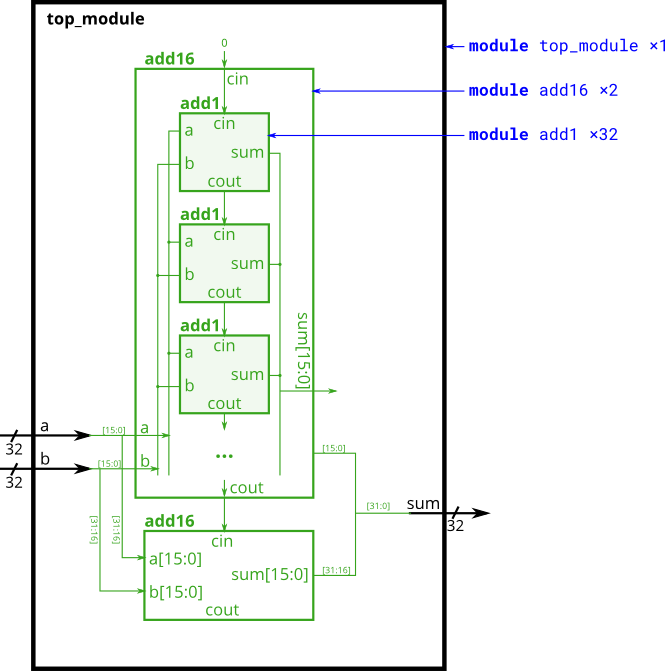
一个执行 16 位加法的模块。必须实例化其中两个才能创建 32 位加法器。一个模块计算加法结果的下16位,而第二个模块计算结果的上限16位。32 位加法器不需要处理携带(假设 0)或执行(忽略)。
module add16 (
input[15:0] a,
input[15:0] b,
input cin,
output[15:0] sum,
output cout
);
在每个中,16个完整的加法器(模块,未提供)被实例化以实际执行加法。
必须编写具有以下声明的完整 adder 模块
module add1 (
input a,
input b,
input cin,
output sum,
output cout
);
此设计中有三个模块:
- top_module 顶层模块,其中包含两个
- add16,提供一个 16 位加法器模块,由 16 个
- add1一个 1 位完整加法器模块。
module top_module(
    input [31:0] a,
    input [31:0] b,
    output [31:0] sum
);
    wire [15:0] high16,low16;
    wire cout1,cout2;

    add16 add16_low_inst(
        .a   (a[15:0]),
        .b   (b[15:0]),
        .cin (1'd0),
        .sum (low16),
        .cout(cout1)
    );

    add16 add16_high_inst(
        .a   (a[31:16]),
        .b   (b[31:16]),
        .cin (cout1),
        .sum (high16),
        .cout(cout2)
    );
    assign sum = {high16,low16};
endmodule

module add1(
    input a,
    input b,
    input cin,
    output sum,
    output cout
);

    assign {cout,sum} = a+b+cin;
endmodule
Module cseladd
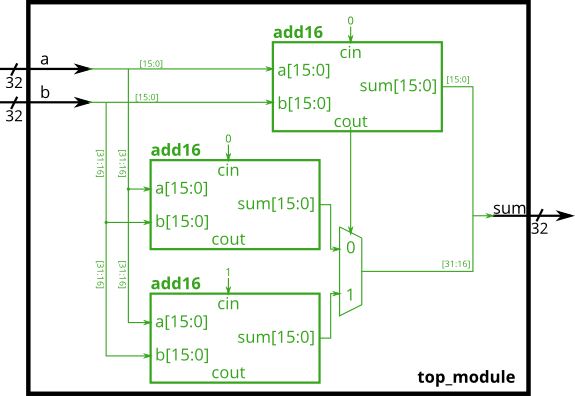
纹波进位加法器的一个缺点, 是加法器计算执行的延迟(在最坏的情况下从进包开始)相当慢,并且第二级加法器在第一级加法器完成之前无法开始计算其进转。这会使加法器变慢。一项改进是进位选择加法器,如下所示。第一级加法器与以前相同,但我们复制了第二级加法器,一个假设携带=0,一个假设携带=1,然后使用快速 2 比 1 多路复用器来选择恰好正确的结果。
在本练习中,将为您提供与上一练习相同的模块,该模块将两个带进转的 16 位数字相加,并生成一个带出数和 16 位总和。您必须实例化其中三个,才能使用自己的 16 位 2 对 1 多路复用器构建进位选择加法器。add16
如下图所示将模块连接在一起。提供的模块具有以下声明:add16
module add16 ( input[15:0] a, input[15:0] b, input cin, output[15:0] sum, output cout );
module top_module(
    input [31:0] a,
    input [31:0] b,
    output [31:0] sum
);

    reg [15:0] sum1,sum2,sum3;
    wire cout1,cout2,cout3;
add16 add16_low_inst(
    .a   (a[15:0]),
    .b   (b[15:0]),
    .cin (1'b0),
    .sum (sum1),
    .cout(cout1)
);

add16 add16_high1_inst(
    .a   (a[31:16]),
    .b   (b[31:16]),
    .cin (1'b0),
    .sum (sum2),
    .cout(cout2)
);

add16 add16_high2_inst(
    .a   (a[31:16]),
    .b   (b[31:16]),
    .cin (1'b1),
    .sum (sum3),
    .cout(cout3)
);

    always@(*)begin
        case(cout1)
            1'b0:sum = {sum2,sum1};
            1'b1:sum = {sum3,sum1};
        endcase
    end

endmodule
Module addsub
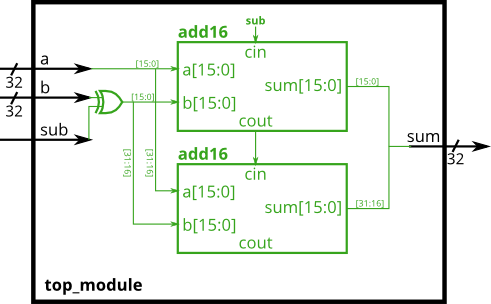
可以通过选择性地否定其中一个输入来从加法器构建加法器-减法器,这相当于反转输入然后加 1。最终结果是一个可以执行两个操作的电路:(a + b + 0)和(a + \~b + 1)。如果您想更详细地解释此电路的工作原理,请参阅维基百科。
在下面构建加法器-减法器。
为您提供了一个 16 位加法器模块,您需要实例化两次:
module add16 ( input[15:0] a, input[15:0] b, input cin, output[15:0] sum, output cout );
module top_module(
    input  [31:0]   a,
    input  [31:0]   b,
    input           sub,
    output [31:0]   sum
);

reg   [31:0]   c;
wire  [15:0]   sum1;
wire  [15:0]   sum2;
wire           cout;

always @(*) begin
    if (~sub) begin
        c = b;
    end
    else begin
        c = ~b;
    end
end

add16 add16_inst_l(
    .a(a[15:0]),
    .b(c[15:0]),
    .cin(sub),
    .cout(cout),
    .sum(sum1)
    );

add16 add16_inst_h(
    .a(a[31:16]),
    .b(c[31:16]),
    .cin(cout),
    .sum(sum2)
    );

assign sum = {sum2,sum1};

endmodule