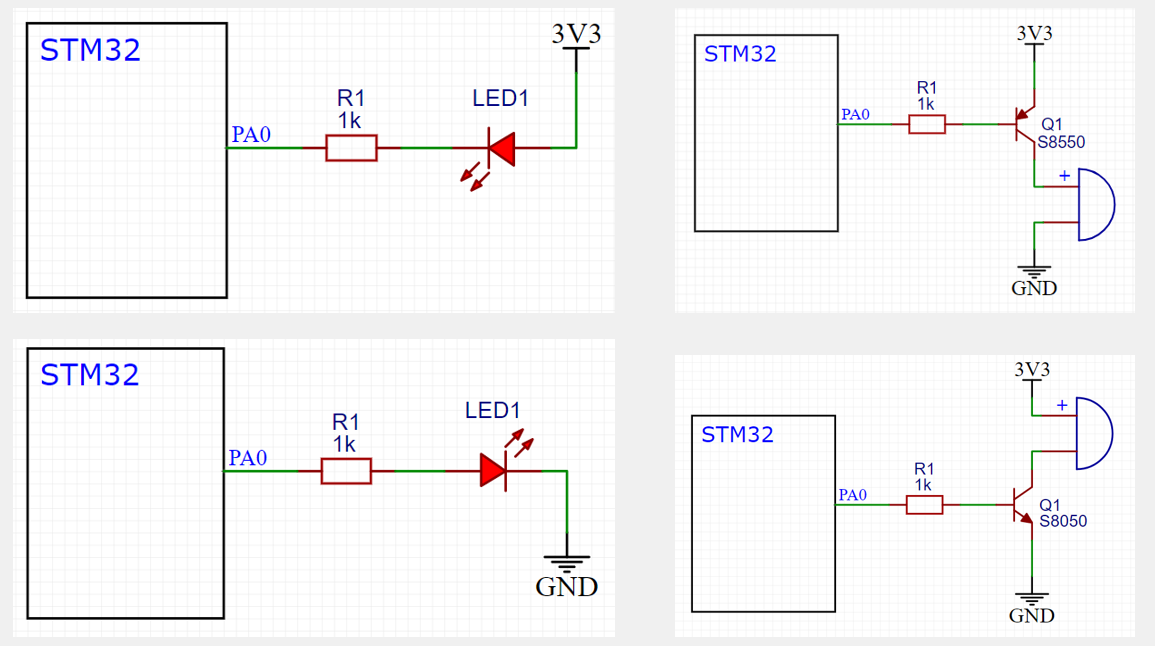
LED和蜂鸣器简介

  • LED:发光二极管,正向通电点亮,反向通电不亮。
  • 有源蜂鸣器:内部自带振荡源,将正负极接上直流电压即可持续发声,频率固定。
  • 无源蜂鸣器:内部不带振荡源,需要控制器提供振荡脉冲才可发声,调整提供振荡脉冲的频率,可发出不同频率的声音。

硬件电路

按键简介

  • 按键:常见的输入设备,按下导通,松手断开。
  • 按键抖动:由于按键内部使用的是机械式弹簧片来进行通断的,所以在按下和松手的瞬间会伴随有一连串的抖动。
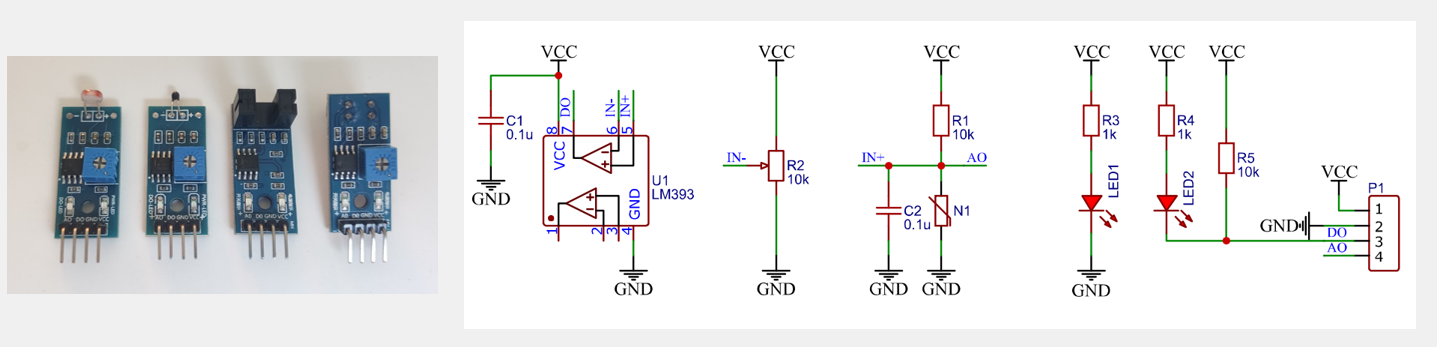
传感器模块简介

  • 传感器模块:传感器元件(光敏电阻/热敏电阻/红外接收管等)的电阻会随外界模拟量的变化而变化,通过与定值电阻分压即可得到模拟电压输出,再通过电压比较器进行二值化即可得到数字电压输出。

C语言数据类型

关键字位数表示范围stdint关键字ST关键字
char8-128 ~ 127int8_ts8
unsigned char80 ~ 255uint8_tu8
short16-32768 ~ 32767int16_ts16
unsigned short160 ~ 65535uint16_tu16
int32-2147483648 ~ 2147483647int32_ts32
unsigned int320 ~ 4294967295uint32_tu32
long32-2147483648 ~ 2147483647
unsigned long320 ~ 4294967295
long long64-(2^64)/2 ~ (2^64)/2-1int64_t
unsigned long long640 ~ (2^64)-1uint64_t
float32-3.4e38 ~ 3.4e38
double64-1.7e308 ~ 1.7e308

C语言宏定义

  • 关键字:#define
  • 用途:用一个字符串代替一个数字,便于理解,防止出错;提取程序中经常出现的参数,便于快速修改
  • 定义宏定义:

#define ABC 12345

  • 引用宏定义:

int a = ABC; //等效于int a = 12345;

C语言typedef

  • 关键字:typedef
  • 用途:将一个比较长的变量类型名换个名字,便于使用
  • 定义typedef:

typedef unsigned char uint8_t;

  • 引用typedef:

uint8_t a; //等效于unsignedchar a;

C语言结构体

  • 关键字:struct
  • 用途:数据打包,不同类型变量的集合
  • 定义结构体变量:

struct{char x; int y; float z;} StructName;

因为结构体变量类型较长,所以通常用typedef更改变量类型名

  • 引用结构体成员:

StructName.x = 'A';

StructName.y = 66;

StructName.z = 1.23;

pStructName->x= 'A'; //pStructName为结构体的地址

pStructName->y= 66;

pStructName->z = 1.23;

C语言枚举

  • 关键字:enum
  • 用途:定义一个取值受限制的整型变量,用于限制变量取值范围;宏定义的集合。
  • 定义枚举变量:

enum{FALSE = 0, TRUE = 1} EnumName;

因为枚举变量类型较长,所以通常用typedef更改变量类型名。

  • 引用枚举成员:

EnumName = FALSE;

EnumName =TRUE;

LED闪烁

main.c

#include "stm32f10x.h"                  // Device header
#include "Delay.h"

int main(void)
{
    RCC_APB2PeriphClockCmd(RCC_APB2Periph_GPIOA, ENABLE);

    GPIO_InitTypeDef GPIO_InitStructure;
    GPIO_InitStructure.GPIO_Mode = GPIO_Mode_Out_PP;
    GPIO_InitStructure.GPIO_Pin = GPIO_Pin_0;
    GPIO_InitStructure.GPIO_Speed = GPIO_Speed_50MHz;
    GPIO_Init(GPIOA, &GPIO_InitStructure);

    while (1)
    {
        GPIO_ResetBits(GPIOA, GPIO_Pin_0);
        Delay_ms(500);
        GPIO_SetBits(GPIOA, GPIO_Pin_0);
        Delay_ms(500);

        GPIO_WriteBit(GPIOA, GPIO_Pin_0, Bit_RESET);
        Delay_ms(500);
        GPIO_WriteBit(GPIOA, GPIO_Pin_0, Bit_SET);
        Delay_ms(500);

        GPIO_WriteBit(GPIOA, GPIO_Pin_0, (BitAction)0);
        Delay_ms(500);
        GPIO_WriteBit(GPIOA, GPIO_Pin_0, (BitAction)1);
        Delay_ms(500);
    }
}

Delay.c

#include "stm32f10x.h"

/**
  * @brief  微秒级延时
  * @param  xus 延时时长,范围:0~233015
  * @retval 无
  */
void Delay_us(uint32_t xus)
{
    SysTick->LOAD = 72 * xus;                //设置定时器重装值
    SysTick->VAL = 0x00;                    //清空当前计数值
    SysTick->CTRL = 0x00000005;                //设置时钟源为HCLK,启动定时器
    while(!(SysTick->CTRL & 0x00010000));    //等待计数到0
    SysTick->CTRL = 0x00000004;                //关闭定时器
}

/**
  * @brief  毫秒级延时
  * @param  xms 延时时长,范围:0~4294967295
  * @retval 无
  */
void Delay_ms(uint32_t xms)
{
    while(xms--)
    {
        Delay_us(1000);
    }
}
 
/**
  * @brief  秒级延时
  * @param  xs 延时时长,范围:0~4294967295
  * @retval 无
  */
void Delay_s(uint32_t xs)
{
    while(xs--)
    {
        Delay_ms(1000);
    }
} 

LED流水灯

main.c

#include "stm32f10x.h"                  // Device header
#include "Delay.h"

int main(void)
{
    RCC_APB2PeriphClockCmd(RCC_APB2Periph_GPIOA, ENABLE);

    GPIO_InitTypeDef GPIO_InitStructure;
    GPIO_InitStructure.GPIO_Mode = GPIO_Mode_Out_PP;
    GPIO_InitStructure.GPIO_Pin = GPIO_Pin_All;
    GPIO_InitStructure.GPIO_Speed = GPIO_Speed_50MHz;
    GPIO_Init(GPIOA, &GPIO_InitStructure);

    while (1)
    {
        GPIO_Write(GPIOA, ~0x0001);    //0000 0000 0000 0001
        Delay_ms(100);
        GPIO_Write(GPIOA, ~0x0002);    //0000 0000 0000 0010
        Delay_ms(100);
        GPIO_Write(GPIOA, ~0x0004);    //0000 0000 0000 0100
        Delay_ms(100);
        GPIO_Write(GPIOA, ~0x0008);    //0000 0000 0000 1000
        Delay_ms(100);
        GPIO_Write(GPIOA, ~0x0010);    //0000 0000 0001 0000
        Delay_ms(100);
        GPIO_Write(GPIOA, ~0x0020);    //0000 0000 0010 0000
        Delay_ms(100);
        GPIO_Write(GPIOA, ~0x0040);    //0000 0000 0100 0000
        Delay_ms(100);
        GPIO_Write(GPIOA, ~0x0080);    //0000 0000 1000 0000
        Delay_ms(100);
    }
}

蜂鸣器

main.c

#include "stm32f10x.h"                  // Device header
#include "Delay.h"

int main(void)
{
    RCC_APB2PeriphClockCmd(RCC_APB2Periph_GPIOB, ENABLE);

    GPIO_InitTypeDef GPIO_InitStructure;
    GPIO_InitStructure.GPIO_Mode = GPIO_Mode_Out_PP;
    GPIO_InitStructure.GPIO_Pin = GPIO_Pin_12;
    GPIO_InitStructure.GPIO_Speed = GPIO_Speed_50MHz;
    GPIO_Init(GPIOB, &GPIO_InitStructure);

    while (1)
    {
        GPIO_ResetBits(GPIOB, GPIO_Pin_12);
        Delay_ms(100);
        GPIO_SetBits(GPIOB, GPIO_Pin_12);
        Delay_ms(100);
        GPIO_ResetBits(GPIOB, GPIO_Pin_12);
        Delay_ms(100);
        GPIO_SetBits(GPIOB, GPIO_Pin_12);
        Delay_ms(700);
    }
}

按键控制LED

main.c

#include "stm32f10x.h"                  // Device header
#include "Delay.h"
#include "LED.h"
#include "Key.h"

uint8_t KeyNum;

int main(void)
{
    LED_Init();
    Key_Init();

    while (1)
    {
        KeyNum = Key_GetNum();
        if (KeyNum == 1)
        {
            LED1_Turn();
        }
        if (KeyNum == 2)
        {
            LED2_Turn();
        }
    }
}

LED.c

#include "stm32f10x.h"                  // Device header

void LED_Init(void)
{
    RCC_APB2PeriphClockCmd(RCC_APB2Periph_GPIOA, ENABLE);

    GPIO_InitTypeDef GPIO_InitStructure;
    GPIO_InitStructure.GPIO_Mode = GPIO_Mode_Out_PP;
    GPIO_InitStructure.GPIO_Pin = GPIO_Pin_1 | GPIO_Pin_2;
    GPIO_InitStructure.GPIO_Speed = GPIO_Speed_50MHz;
    GPIO_Init(GPIOA, &GPIO_InitStructure);

    GPIO_SetBits(GPIOA, GPIO_Pin_1 | GPIO_Pin_2);
}

void LED1_ON(void)
{
    GPIO_ResetBits(GPIOA, GPIO_Pin_1);
}

void LED1_OFF(void)
{
    GPIO_SetBits(GPIOA, GPIO_Pin_1);
}

void LED1_Turn(void)
{
    if (GPIO_ReadOutputDataBit(GPIOA, GPIO_Pin_1) == 0)
    {
        GPIO_SetBits(GPIOA, GPIO_Pin_1);
    }
    else
    {
        GPIO_ResetBits(GPIOA, GPIO_Pin_1);
    }
}

void LED2_ON(void)
{
    GPIO_ResetBits(GPIOA, GPIO_Pin_2);
}

void LED2_OFF(void)
{
    GPIO_SetBits(GPIOA, GPIO_Pin_2);
}

void LED2_Turn(void)
{
    if (GPIO_ReadOutputDataBit(GPIOA, GPIO_Pin_2) == 0)
    {
        GPIO_SetBits(GPIOA, GPIO_Pin_2);
    }
    else
    {
        GPIO_ResetBits(GPIOA, GPIO_Pin_2);
    }
}

KEY.c

#include "stm32f10x.h"                  // Device header
#include "Delay.h"

void Key_Init(void)
{
    RCC_APB2PeriphClockCmd(RCC_APB2Periph_GPIOB, ENABLE);

    GPIO_InitTypeDef GPIO_InitStructure;
    GPIO_InitStructure.GPIO_Mode = GPIO_Mode_IPU;
    GPIO_InitStructure.GPIO_Pin = GPIO_Pin_1 | GPIO_Pin_11;
    GPIO_InitStructure.GPIO_Speed = GPIO_Speed_50MHz;
    GPIO_Init(GPIOB, &GPIO_InitStructure);
}

uint8_t Key_GetNum(void)
{
    uint8_t KeyNum = 0;
    if (GPIO_ReadInputDataBit(GPIOB, GPIO_Pin_1) == 0)
    {
        Delay_ms(20);
        while (GPIO_ReadInputDataBit(GPIOB, GPIO_Pin_1) == 0);
        Delay_ms(20);
        KeyNum = 1;
    }
    if (GPIO_ReadInputDataBit(GPIOB, GPIO_Pin_11) == 0)
    {
        Delay_ms(20);
        while (GPIO_ReadInputDataBit(GPIOB, GPIO_Pin_11) == 0);
        Delay_ms(20);
        KeyNum = 2;
    }

    return KeyNum;
}

光敏传感器控制蜂鸣器

main.c

#include "stm32f10x.h"                  // Device header
#include "Delay.h"
#include "Buzzer.h"
#include "LightSensor.h"

int main(void)
{
    Buzzer_Init();
    LightSensor_Init();

    while (1)
    {
        if (LightSensor_Get() == 1)
        {
            Buzzer_ON();
        }
        else
        {
            Buzzer_OFF();
        }
    }
}

LightSensor.c

#include "stm32f10x.h"                  // Device header

void LightSensor_Init(void)
{
    RCC_APB2PeriphClockCmd(RCC_APB2Periph_GPIOB, ENABLE);

    GPIO_InitTypeDef GPIO_InitStructure;
    GPIO_InitStructure.GPIO_Mode = GPIO_Mode_IPU;
    GPIO_InitStructure.GPIO_Pin = GPIO_Pin_13;
    GPIO_InitStructure.GPIO_Speed = GPIO_Speed_50MHz;
    GPIO_Init(GPIOB, &GPIO_InitStructure);
}

uint8_t LightSensor_Get(void)
{
    return GPIO_ReadInputDataBit(GPIOB, GPIO_Pin_13);
}

Buzzer.c

#include "stm32f10x.h"                  // Device header

void Buzzer_Init(void)
{
    RCC_APB2PeriphClockCmd(RCC_APB2Periph_GPIOB, ENABLE);

    GPIO_InitTypeDef GPIO_InitStructure;
    GPIO_InitStructure.GPIO_Mode = GPIO_Mode_Out_PP;
    GPIO_InitStructure.GPIO_Pin = GPIO_Pin_12;
    GPIO_InitStructure.GPIO_Speed = GPIO_Speed_50MHz;
    GPIO_Init(GPIOB, &GPIO_InitStructure);

    GPIO_SetBits(GPIOB, GPIO_Pin_12);
}

void Buzzer_ON(void)
{
    GPIO_ResetBits(GPIOB, GPIO_Pin_12);
}

void Buzzer_OFF(void)
{
    GPIO_SetBits(GPIOB, GPIO_Pin_12);
}

void Buzzer_Turn(void)
{
    if (GPIO_ReadOutputDataBit(GPIOB, GPIO_Pin_12) == 0)
    {
        GPIO_SetBits(GPIOB, GPIO_Pin_12);
    }
    else
    {
        GPIO_ResetBits(GPIOB, GPIO_Pin_12);
    }
}

参考资料

STM32入门教程-2023版 细致讲解 中文字幕\_哔哩哔哩\_bilibili

最后修改:2023 年 10 月 21 日
如果觉得我的文章对你有用,请随意赞赏